
仅适用于早期实验。 本页命令描述原 VEMU 时代的安装流程。ACE-Echo 1.0 请使用 Gem5 入门指南,其编译器与后端配置不同。
早期 Echo 提供两种部署方式:本地编译工具链(方案 1)适合长期开发和底层调试;Docker 快速部署(方案 2)适合体验、临时验证和统一环境。
系统要求
仅支持 Linux。原记录推荐 Ubuntu 18.04+(测试过 18.04、20.04、22.04、24.04)或 Debian 10+。
- CPU:4 核以上
- 内存:16 GB 以上
- 磁盘:26 GB 以上
- Git ≥ 2.25;Python ≥ 3.8;CMake ≥ 3.16
方案 1:本地编译工具链
1. 安装依赖
sudo apt update
sudo apt-get install autoconf automake autotools-dev curl python3 python3-pip libmpc-dev libmpfr-dev libgmp-dev gawk build-essential bison flex texinfo gperf libtool patchutils bc zlib1g-dev libexpat-dev ninja-build git cmake libglib2.0-dev
2. 安装 RISC-V 工具链与 Venus 定制 LLVM
# Install RISC-V Toolchain
git clone https://github.com/riscv-collab/riscv-gnu-toolchain.git
cd ./riscv-gnu-toolchain

# Generate a compilation file
# The directory /usr/venus_compiler/opt-riscv32-glibc-ima can be modified to any path of your choice.
./configure --prefix=/usr/venus_compiler/opt-riscv32-glibc-ima --with-arch=rv32ima --with-abi=ilp32

# Compile
sudo make
# Install our modified LLVM
git clone https://github.com/ACELab-SHU/Venus-Compiler.git
cd ./Venus-Compiler/
git checkout develop
cd ./venus-llvm-project-venus
mkdir build
cd ./build
sudo apt-get install ccache
cmake -G Ninja -DCMAKE_BUILD_TYPE=Release -DCMAKE_INSTALL_PREFIX=../../llvm-bin -DLLVM_TARGETS_TO_BUILD="RISCV" -DLLVM_CCACHE_BUILD=ON -DLLVM_ENABLE_PROJECTS="clang;llvm" -DLLVM_USE_LINKER=gold -DLLVM_DEFAULT_TARGET_TRIPLE="riscv32-unknown-elf" ../llvm && ninja install
编译后,RISC-V 工具链生成 opt-riscv32-glibc-ima 目录,LLVM 生成 venus-llvm-project-venus/llvm-bin/bin 目录。记下这两个路径,稍后更新 Echo 配置。
3. 克隆 Echo 项目
git clone https://github.com/ACELab-SHU/ACE-Echo.git
cd ./ACE-Echo/dsl
vim ./config.mk
修改 config.mk 中的 LLVM 与 RISC-V GNU toolchain 路径。
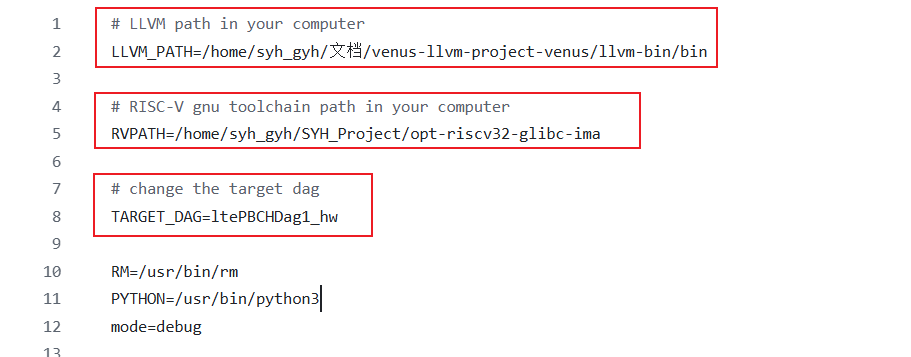
可以通过 TARGET_DAG 切换构建目标;初次运行建议保留默认值,先完成测试。
4. 运行示例或测试
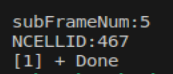
在 VSCode 中打开 Echo 文件夹,确保顶层文件夹为 Echo,按 F5 进入调试模式。正常时终端会显示类似下面的结果。
方案 2:使用 Docker 快速部署
旧 Docker 镜像用于快速部署 Venus 仿真器,包含 LTE/5G 例程。
步骤面向 Linux,Windows/macOS 需要自行适配。镜像约 26GB,请预留足够磁盘空间。
方式 1:终端运行,浏览器访问
- 从 Zenodo 下载
ace-echo-docker.tar,导入本地 Docker:
# Replace `[path]` with the actual path.
docker load -i /[path]/ace-echo-docker.tar
- 启动容器:
docker run -it -p 8080:8080 -v $(pwd):/root/ACE-Echo ace-echo
- 浏览器打开
http://localhost:8080,将文件夹设置为/root/ACE-Echo/AURA/Docker_Echo/ACE-Echo/,点击 Start Debugging。
方式 2:VSCode 与 Docker 扩展
- 与方式 1 相同,导入镜像:
# Replace `[path]` with the actual path.
docker load -i /[path]/ace-echo-docker.tar
- 打开 VSCode,在活动栏点击 Containers 图标,在容器列表找到
ace-echo-docker,右键选择 Start。 - 可右键运行中的容器选择 Open in Browser,然后按照方式 1 的第 3 步执行。
也可以直接在 VSCode 中管理容器:安装 Dev Containers 与 C/C++ Debug (gdb),点击左下角 Open a Remote Window,选择 Attach to Running Container,连接 ace-echo 容器。将文件夹设置为 /root/ACE-Echo/AURA/Docker_Echo/ACE-Echo/,点击 Start Debugging。
项目目录概览
v0.1 项目目录结构如下。
ACE-ECHO/
├── .vscode/
├── AceEcho/
│   └── tasks/                 # Collection of task-related modules
│       ├── include/           # Header files directory for tasks
│       ├── ltePBCH/           # LTE PBCH-related functional module
│       ├── ltePBCHDag1_hw/    # LTE PBCH Hardware Task Directed Acyclic Graph (DAG) Module 1
│       ├── ltePBCHDag2_hw/    # LTE PBCH Hardware Task Directed Acyclic Graph (DAG) Module 2
│       ├── ltePCFICH/         # LTE PCFICH-related functional module
│       ├── PBCH/              # PBCH functionality implementation module
│       ├── PDCCH/             # PDCCH functionality implementation module
│       ├── PDSCH/             # PDSCH functionality implementation module
│       └── Test_Single_Task/  # Collection of single-task test cases
├── Debug/                     # Directory for debugging artifacts and logs
│   ├── emulator_vins_result/  # Output directory for emulator (vins) runtime results
│   ├── .gitignore/
│   ├── console.log/
│   ├── DAGRet_nCellID.log/
│   ├── DAGRet_subFrameNum.log/
│   ├── emu_dsll.log/
│   └── Emulator/
├── dsl/                       # Directory for Domain-Specific Language (DSL) related files
│   ├── bin/
│   ├── final_output/
│   ├── heft_new/
│   ├── IJ/
│   ├── ply/
│   ├── script/
│   ├── variable/
│   ├── venus_test/
│   ├── .config.mk.swp/
│   ├── .gitignore/
│   ├── config.mk/             # Makefile configuration for DSL builds
│   ├── debug.txt/
│   ├── ltePBCHDag1_hw.bas/
│   ├── ltePBCHDag1.bas/
│   └── Makefile/
├── firmware/
│   ├── check.hex/
│   ├── dhrystone.hex/
│   ├── firmware_cordic.hex/
│   ├── firmware.hex/
│   └── rot13.hex/
├── include/
│   ├── nlohmann/
│   ├── RISCV.h/
│   └── venus_ext.h/
├── source/
│   ├── main.cpp/
│   ├── RISCV.cpp/
│   └── venus_ext.cpp/
├── task_utils/                # Directory for task-related utility functions and helper code
│   ├── riscv_printf.h/        # Header file for RISCV architecture-compatible printf implementation
│   └── venus.h/               # Core header file for Venus module
├── .clang-format/
├── .gitignore/
├── analysis.py/
├── Makefile/
├── README.md/                 # Project documentation
└── register_analysis.sh/      # Shell script (for register analysis)
联系我们
使用中遇到问题,可联系 shenyihao@shu.edu.cn。