Welcome to the Echo project! We offer two methods: local compilation chain deployment (Option 1) and Docker rapid deployment (Option 2) to help you quickly set up the development environment, install dependencies and build the code base.
● Option 1: Suitable for long-term development, or low-level code debugging.
● Option 2: Suitable for quick project experience, temporary validation, or scenarios requiring environment consistency.
✅ System Requirements
⚠️ Linux only — Ubuntu 18.04+(18.04, 20.04, 22.04, 24.04 is tested) or Debian 10+ recommended
-
CPU: 4+ cores
-
RAM: 16 GB+
-
Disk: 26 GB+
-
Git ≥ 2.25
-
Python ≥ 3.8
-
CMake ≥ 3.16
🏷️Option 1: Local compilation chain deployment
1. Install Dependencies
sudo apt update
sudo apt-get install autoconf automake autotools-dev curl python3 python3-pip libmpc-dev libmpfr-dev libgmp-dev gawk build-essential bison flex texinfo gperf libtool patchutils bc zlib1g-dev libexpat-dev ninja-build git cmake libglib2.0-dev
2. Install RISC-V Toolchain & our modified LLVM (for Venus backend)
# Install RISC-V Toolchain
git clone https://github.com/riscv-collab/riscv-gnu-toolchain.git
cd ./riscv-gnu-toolchain

# Generate a compilation file
# The directory /usr/venus_compiler/opt-riscv32-glibc-ima can be modified to any path of your choice.
./configure --prefix=/usr/venus_compiler/opt-riscv32-glibc-ima --with-arch=rv32ima --with-abi=ilp32

# Compile
sudo make
# Install our modified LLVM
git clone https://github.com/ACELab-SHU/Venus-Compiler.git
cd ./Venus-Compiler/
git checkout develop
cd ./venus-llvm-project-venus
mkdir build
cd ./build
sudo apt-get install ccache
cmake -G Ninja -DCMAKE_BUILD_TYPE=Release -DCMAKE_INSTALL_PREFIX=../../llvm-bin -DLLVM_TARGETS_TO_BUILD="RISCV" -DLLVM_CCACHE_BUILD=ON -DLLVM_ENABLE_PROJECTS="clang;llvm" -DLLVM_USE_LINKER=gold -DLLVM_DEFAULT_TARGET_TRIPLE="riscv32-unknown-elf" ../llvm && ninja install
After compilation, you will obtain the opt-riscv32-glibc-ima directory generated by the RISC-V Toolchain, and the venus-llvm-project-venus/llvm-bin/bin directory generated by LLVM.
Make sure to remember these two paths, as you will need to update them later in the Echo project.
3. Clone the Echo Project
git clone https://github.com/ACELab-SHU/ACE-Echo.git
cd ./ACE-Echo/dsl
vim ./config.mk
Modify the LLVM path and the RISC-V GNU toolchain path in the config.mk file.
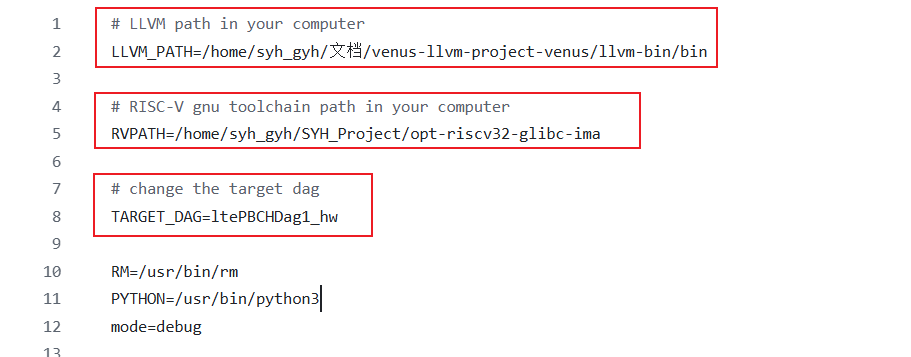
You can also modify TARGET_DAG to change the build target, but it’s recommended not to change it for now — just run the test first.
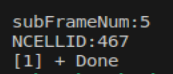
4. Run a Demo or Test
Open the Echo folder in VSCode, making sure that the top-level folder is Echo, then press F5 to start debugging mode directly.
If everything works correctly, you will see the following information printed in the terminal.
🏷️Option 2: Use Docker for rapid deployment
🔍Overview
This Docker image is designed for the rapid deployment of the Venus emulator, providing LTE/5G-related routines.● Image Link: https://zenodo.org/records/15803394
● GitHub Repository: https://github.com/ACELab-SHU/ACE-Echo/tree/master
Notes:
- The following steps are intended for Linux systems. Users of Windows and macOS should adapt them according to their respective systems.
- This image is about 26GB. Make sure you have enough space on your disk.
📝Solution 1: Run via Terminal and Access via Browser
1. Obtain the Image (Download from Zenodo)
- Visit the Zenodo dataset page and download the image tarball (ace-echo-docker.tar).
-
Import it into your local Docker environment:
# Replace `[path]` with the actual path.
docker load -i /[path]/ace-echo-docker.tar
2. Launch the Container
docker run -it -p 8080:8080 -v $(pwd):/root/ACE-Echo ace-echo
3. Execute Code in Browser
- Open your browser and navigate to http://localhost:8080 to access the interface.
- Set the folder path to /root/ACE-Echo/AURA/Docker_Echo/ACE-Echo/ and click Start Debugging to run the application.
📝Solution 2: Run via VSCode + Docker Extension
Prerequisites
- Install
- Install the
1. Import the Image (Same as Solution 1)
Import the Zenodo-downloaded image via the terminal:# Replace `[path]` with the actual path.
docker load -i /[path]/ace-echo-docker.tar
2. Start the Container in VSCode
- Open VSCode and click the Containers icon in the Activity Bar.
- Locate ace-echo-docker in the Containers list, then right-click and select Start.
3. Run the Application
🧪Method 1: Execute Code in Browser
Right-click the running ace-echo-docker container and select Open in Browser. Follow Step 3 from Solution 1 thereafter.
🧪Method 2: Manage the Container within VSCode
Extensions need to be installed: Dev Containers and C/C++ Debug (gdb).
- Click Open a Remote Window at the bottom-left corner.
- Select Attach to Running Containerfrom the dropdown, then choose the ace-echo-related container.
- Set the folder path to /root/ACE-Echo/AURA/Docker_Echo/ACE-Echo/ and click Start Debugging.
📂Project Structure (Overview)
ACE-ECHO/
├── .vscode/
├── AceEcho/
│   └── tasks/                 # Collection of task-related modules
│       ├── include/           # Header files directory for tasks
│       ├── ltePBCH/           # LTE PBCH-related functional module
│       ├── ltePBCHDag1_hw/    # LTE PBCH Hardware Task Directed Acyclic Graph (DAG) Module 1
│       ├── ltePBCHDag2_hw/    # LTE PBCH Hardware Task Directed Acyclic Graph (DAG) Module 2
│       ├── ltePCFICH/         # LTE PCFICH-related functional module
│       ├── PBCH/              # PBCH functionality implementation module
│       ├── PDCCH/             # PDCCH functionality implementation module
│       ├── PDSCH/             # PDSCH functionality implementation module
│       └── Test_Single_Task/  # Collection of single-task test cases
├── Debug/                     # Directory for debugging artifacts and logs
│   ├── emulator_vins_result/  # Output directory for emulator (vins) runtime results
│   ├── .gitignore/
│   ├── console.log/
│   ├── DAGRet_nCellID.log/
│   ├── DAGRet_subFrameNum.log/
│   ├── emu_dsll.log/
│   └── Emulator/
├── dsl/                       # Directory for Domain-Specific Language (DSL) related files
│   ├── bin/
│   ├── final_output/
│   ├── heft_new/
│   ├── IJ/
│   ├── ply/
│   ├── script/
│   ├── variable/
│   ├── venus_test/
│   ├── .config.mk.swp/
│   ├── .gitignore/
│   ├── config.mk/             # Makefile configuration for DSL builds
│   ├── debug.txt/
│   ├── ltePBCHDag1_hw.bas/
│   ├── ltePBCHDag1.bas/
│   └── Makefile/
├── firmware/
│   ├── check.hex/
│   ├── dhrystone.hex/
│   ├── firmware_cordic.hex/
│   ├── firmware.hex/
│   └── rot13.hex/
├── include/
│   ├── nlohmann/
│   ├── RISCV.h/
│   └── venus_ext.h/
├── source/
│   ├── main.cpp/
│   ├── RISCV.cpp/
│   └── venus_ext.cpp/
├── task_utils/                # Directory for task-related utility functions and helper code
│   ├── riscv_printf.h/        # Header file for RISCV architecture-compatible printf implementation
│   └── venus.h/               # Core header file for Venus module
├── .clang-format/
├── .gitignore/
├── analysis.py/
├── Makefile/
├── README.md/                 # Project documentation
└── register_analysis.sh/      # Shell script (for register analysis)
📬Connect
If you encounter any problems during use, please contact: shenyihao@shu.edu.cn.